

Voyado
Omnium provides a standardized integration with Voyado Engage. This integration provides the opportunity to outsource customer club and CRM functionality to Voyado.
The Voyado integration supports the following
- Synchronization of customers
- One-way sync (Omnium as Master)
- Two-way sync
- Export of receipts
- Order receipts
- Return receipts
- Receipt enrichment (from product data)
- Loyalty and CRM over webhooks
- Bonus point balance
- Reward vouchers (import and redeem-at-capture)
- Personal offers / promotions (coming)
- Promotions/Personal offers
Customers
Mapping Options
Contact types
The Omnium-Voyado integration provides several options for customizing the sync of customers to Voyado. In Voyado Engage there is the concept of contact-types, which separates between Contacts and Members. This is somewhat analogous to the separation between customers and customer club members in Omnium. In the default setup, this separation is mirrored between Omnium and Voyado, mapping PrivateCustomers to Voyado-Contacts and CustomerClubMembers to Voyado Members. However, depending on the use case, different customers might require different behaviors. The Omnium-Voyado integration supports several options for this flow.
| Default | ExportMembersOnly | ExportAllCustomersAsMember | |
|---|---|---|---|
| PrivateCustomer | Contact | - | Member |
| CustomerClubMember | Member | Member | Member |
Other options
| Description | Use case | |
|---|---|---|
| IgnoreConsents | This setting instructs Omnium to ignore consents when syncing customers | Used when Voyado is master of consents and they are pushed directly to Voyado. |
| UniqueIdentifier | Specifies the field that constitutes the unique identifier for a customer | In a case with a 2-way customer sync between Omnium and Voyado and 3rd party systems that create contacts directly in Voyado, Omnium needs to know which field it should use as customer Id in Omnium. This ensures unique customers. Supported options are Email and Phone. |
| SyncDelete | A delete operation in Omnium should also delete the corresponding Voyado contact | |
| ConsentMapping | It is possible to configure custom mappings between customer consents in Omnium and Contact preferences and Consents in Voyado | When collecting consents from 3rd parties or migrating an existing solution, it is useful to map the collected consents to the corresponding consents configured in Voyado. |
Sync of customers from Omnium to Voyado
Sync of customers from Omnium to Voyado is done synchronously every time a customer is updated in Omnium. This is done by setting up the VoyadoExporter to implement IPrivateCustomerExporter, which creates a client exporting contacts to the Voyado Engage API. To relate customers in Omnium and Contacts in Voyado, Omnium stores the Voyado ContactId as an externalId on the private customer object in Omnium. Should the export of a customer fail, an error message will be displayed on the customer card in Omnium, with the option to inspect the error message returned from the Voyado Engage API.
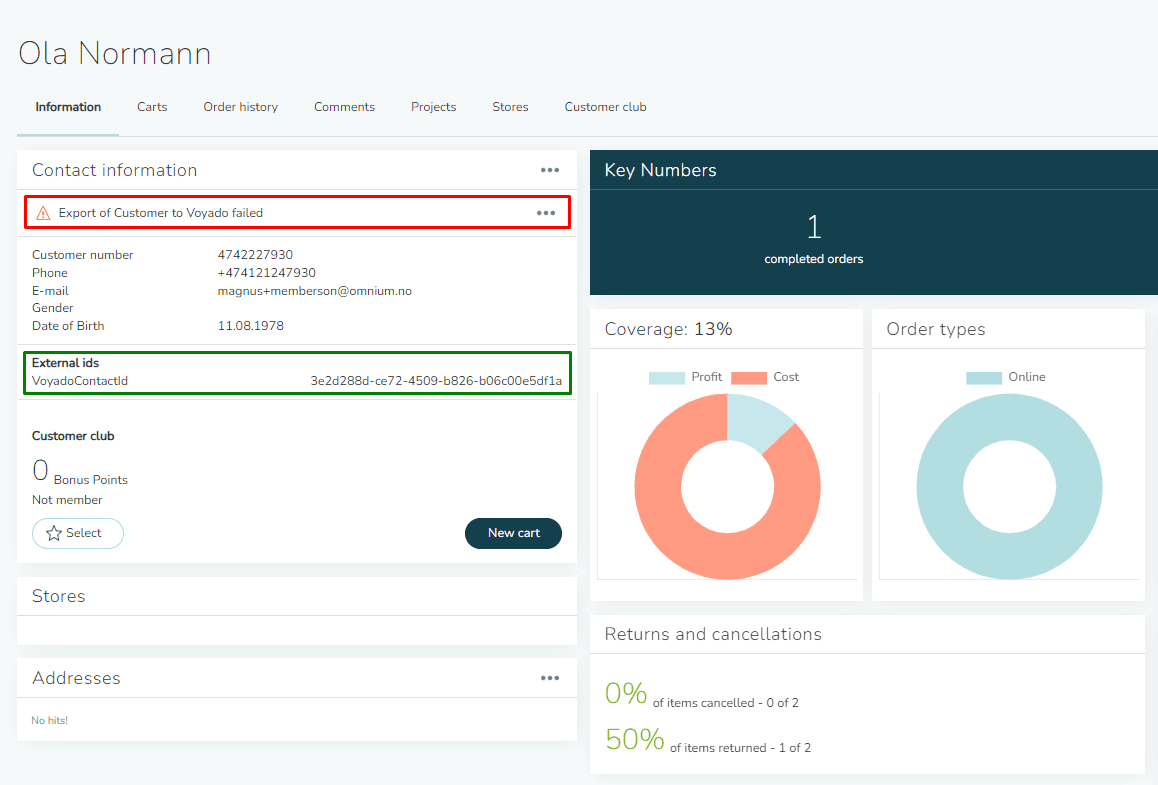
The following table shows the various operations used in syncing data from Omnium to Voyado.
| Operation | Endpoint | Condition | Use case | Notes |
|---|---|---|---|---|
| GET | /api/v2/contacts/{contactId} | Omnium has an externalId referencing a Contact in Voyado | Used to look up existing contacts in Voyado based on Id | |
| GET | /api/v2/contacts/{contactType}/bykey/{keyValue} | Omnium doesn't have an externalId referencing a Contact | Used to look up existing contacts in Voyado based on key (email/phone) | |
| POST | /api/v2/contacts/{contactId}/promoteToMember | The member status of a customer changes in Omnium | Changes contact type from Contact to Member in Voyado | |
| POST | /api/v2/contacts/{contactId}/updateContactType | The member status of a customer changes in Omnium | Changes contact type from Member to Contact in Voyado | |
| POST | /api/v2/contacts | Existing customer in Voyado not found upon update | Creates new contact in Voyado | |
| POST | /api/v2/contacts/{contactId} | Existing customer in Voyado found upon update | Updates existing contact in Voyado | |
| DELETE | /api/v2/contacts/{contactId} | Customer deleted in Omnium | Deletes existing contact in Voyado | Only triggered if Voyado connector is configured for delete propagation |
Sync of customers from Voyado to Omnium
Sync of customers from Voyado to Omnium is performed asynchronously by polling the endpoint /api/v2/contacts/changes in the Voyado Engage API at regular intervals. This process is configured through the scheduled task VoyadoContactSync, where you can specify the frequency of the polls. The minimum allowed interval is once every minute.
Property Mapping
When syncing customers from Voyado to Omnium, you can map additional Voyado contact attributes onto Omnium customer properties using the Property mapping table in the Voyado connector settings. Each row maps one Voyado field to one Omnium property:
| Column | Meaning |
|---|---|
| Omnium property (left) | The property to set on the Omnium customer. If the name matches a built-in field on the customer, that field is set directly; otherwise the value is stored as a custom property. |
| Voyado field (right) | The contact attribute to read the value from. Field names are matched case-insensitively. |
If a mapped field is missing from the Voyado contact, the corresponding Omnium property is left untouched. An explicit null value from Voyado is honored and clears the property in Omnium.
Member level mapping
Voyado exposes the customer's loyalty member level as a memberlevel object on the contact. To sync it into Omnium, add a property mapping that points to the desired field on that object using dot notation. For example, to store the level name on a memberLevel property in Omnium:
| Omnium property | Voyado field |
|---|---|
memberLevel | memberlevel.levelName |
Any field on the memberlevel object can be mapped this way (for example memberlevel.levelId or memberlevel.expires); refer to the Voyado documentation for the available fields. Once mapped, the property is available on the customer in Omnium and can be highlighted on the customer card.
Customer Group Mapping
When syncing customers from Voyado to Omnium, you can populate the customer's customer groups from a Voyado contact attribute.
To set it up, enter the name of the Voyado attribute in the Customer group field (CustomerGroupField) setting in the Voyado connector settings — for example membershipTier.
On each contact sync, Omnium reads that attribute on the contact and adds the customer to a customer group for each value it holds. For example, a contact with membertype = ["employee", "member"] is added to both the employee and member groups, while a contact with a single value is added to just that one group.
The value becomes both the id and name of the group, and any group that does not yet exist in Omnium is created automatically during the contact sync. Attribute names are matched case-insensitively.
Once populated, customer groups can be used to target promotions — a promotion that lists one or more customer groups applies only to customers belonging to at least one of them. This makes it possible to drive group-based campaigns (for example membership tiers such as Bronze/Silver/Gold) when the tier is delivered as a customer group attribute.
Consent and Preference Mapping
Omnium stores all marketing opt-ins as a single list of consents on the customer. Voyado splits them across two structures on a contact:
preferences– the three standard booleansAcceptsEmail,AcceptsSms, andAcceptsPostal.consents– custom, named consents defined per Voyado tenant (for exampleacceptsTracking).
The connector has one mapping table for each:
- Preferences mapping – maps an Omnium consent type to one of the three standard Voyado preferences.
- Consents mapping – maps an Omnium consent type to a custom Voyado consent, by its id.
In both tables the left column is the Omnium consent type and the right column is the Voyado field.
Both mappings are optional. Without them, opt-ins still sync: Voyado preferences are stored under their standard names (AcceptsEmail, AcceptsSms, AcceptsPostal) and named consents under their Voyado id. Configure a mapping when you want the Omnium consent to use a different name — for example to align with consents your storefront already writes.
When the connector has a connector prefix (see Multiple Voyado Instances), opt-ins synced from Voyado are stored on the Omnium customer with the prefix in front of the name, for example INO_acceptsTracking for prefix INO. This applies to both preferences and consents, with or without a mapping, and keeps opt-ins from several Voyado instances apart on the same customer. The prefix never reaches Voyado: when syncing to Voyado, the connector reads the prefixed consents and sends them under the Voyado name. Consents on the customer without this connector's prefix are not sent to that Voyado instance, so a storefront or other integration that writes opt-ins for a prefixed connector must write the prefixed type.
When Voyado data syncs into Omnium, each incoming opt-in updates the existing consent with the same type, or is added as a new one if none matches. The match is exact, including casing, so acceptsEmail and AcceptsEmail count as two separate consents. Map opt-ins explicitly to keep the names aligned and avoid a duplicate entry under each name.
Get or Create Customers from Voyado
Omnium supports integrating the Voyado connector with the workflow step
GetOrCreateCustomerFromOrder. This is enabled by configuring VoyadoExporter
as the connector for the workflow step.
When the Voyado connector is attached, the behavior of the workflow step is modified as described below.
Customer resolution logic
When customerId is provided
-
Look up customer in Omnium
Omnium attempts to find an existing customer whoseexternalIdmatches the providedcustomerId(i.e. customers that have already been synchronized from Voyado). -
Fallback 1: Look up contact in Voyado based on
contactId
If no matching customer is found in Omnium, Omnium attempts to locate a contact in Voyado with a matchingcontactId. -
Fallback 2: Try to find existing Omnium customer with matching
customerId
If no matching customer has been found andorder.customerIdis set, Omnium tries to find an existing Omnium customer with the corresponding Id. -
Fallback 3: Look up contact in Voyado based on phone/email If no matching customer has been found, Omnium attempts to locate a contact in Voyado based on phone/email. If
CustomerClubMemberIdis set on the order Omnium will search for a Member in Voyado, if not Omnium will seach for any contact. -
Fallback 4: Try to create Voyado contact If neither lookup succeeds, Omnium will try to create the contact in Voyado and in Omnium based on the information available on the order.
-
Fallback 5: Default Omnium behavior
If no matching customer has been found, Omnium falls back to the default behavior ofGetOrCreateCustomerFromOrderand gets or creates a customer in Omnium based on the providedcustomerId.
When customerId is not provided
- Omnium uses the phone number and email address from the order to search for a matching customer in Voyado.
- If a match is found, the customer is imported from Voyado into Omnium.
Notes
- In this setup,
customerIdmay refer to either:- the Voyado ContactId, or
- the Omnium customerId.
GetOrCreateCustomerMode
Set GetOrCreateCustomerMode to MemberLookupOnly to restrict Voyado lookup to club members only. Omnium first checks for an existing customer in Omnium by externalId, then looks up the Voyado contact using CustomerClubMemberId from the order. If no match is found at either step, no Voyado contact is resolved — Omnium falls back to getting or creating a customer in Omnium based on the provided customerId, without any Voyado involvement.
Use case: When only loyalty members should be resolved via Voyado and guest/non-member checkouts should proceed without a Voyado contact.
Receipts
Export of both order and return receipts from Omnium to Voyado can be configured through workflow steps in Omnium.
As receipts in Voyado cannot be altered once created, it is recommended that the export of order receipts is always set up at the very end of an order's workflow.
See Excluding Products from Receipts and Bonus Calculations for how order lines are left out of a receipt and how a receipt with no items is handled.
Receipt Enrichment
Transaction objects (receipts) exported to Voyado are lightweight and contain limited product information. To provide more context, receipts can be enriched with product data from Omnium.
This is done via an XML export that includes all products in Omnium and sends them to Voyado. The export frequency is managed by the scheduled task:
- Task:
VoyadoProductDataExport - Recommended Frequency: Once daily
- Format Specification: Voyado Enrichment XML Format
See section below for details on the xml product feed.
Voyado Product Data Export – Field Mappings
Standard Field Mappings
| Voyado Field | Omnium Source |
|---|---|
sku | skuId, or Ean when UseEanAsProductIdentifier is on |
number | Product.ProductId |
name | Variant.Name |
maincategory | ProductCategory.Name |
brand | Brand |
color | Color |
size | Size |
group | Product.ProductType |
productcategory | ProductCategory.Name |
subcategory | ProductCategory.Name |
gender | Gender |
season | Season |
spare1–spare10 | Configurable custom properties |
Category Mapping Logic
The category hierarchy is resolved using a parent traversal algorithm.
1. Main Category Determination
- First checks
Product.MainCategoryId - If empty and the product has variants, checks
Variant.MainCategoryIdfor the specific variant - Falls back to the first category marked as
IsMainCategoryinProductCategories - Final fallback: the first category in the
ProductCategorieslist
2. Hierarchy Traversal
-
Starting from the main category, traverses upward through parent categories using
ParentId -
Creates a linked list:
-
Maximum of 20 iterations to prevent infinite loops
3. Category Assignment
maincategory= resolved main category nameproductcategory= parent of the main category (secondary level)subcategory= grandparent of the main category (tertiary level)
Example Hierarchy
Optional Settings
Two optional settings change the traversal direction from child→parent to parent→child, and let you pin the starting point in the hierarchy.
Category Tree Root ID
Pin the hierarchy to a specific category. When set, that category becomes maincategory and the levels below it fill productcategory and subcategory.
Example — root ID set to third level (Outerwear):
Skip Root (Use Category Hierarchy After Root)
When enabled, the root category (global root, or the one set above) is skipped and mapping starts one level below it.
The two settings compose: if both are set, the specified category is used as the root and then skipped.
Parent Products (Export Parent Products)
By default, a product with variants produces one article per variant and none for the parent. Enable Export parent products on the connector (ExportParentProducts) to also export the parent as an article. Use this when stores sell the main product, so its receipt lines can be enriched.
The parent row uses the parent's ProductId as sku, or its Ean when UseEanAsProductIdentifier is on. number is the parent's ProductId, as on the variant rows. The row is skipped if a variant already has the same sku.
Custom Fields (spare1–spare10)
Custom properties are mapped to spare1 through spare10 fields based on connector configuration.
-
Configuration:
VoyadoProductDataCustomPropertiesconnector setting -
Format: Comma-separated list of property names Example:
-
Mapping order:
- 1st property →
spare1 - 2nd property →
spare2 - …
- 1st property →
-
Retrieval: the value on the variant is used first, then the value on the parent product. The parent row reads from the parent product.
Export Process
-
Products are processed in batches of 1000
-
For products with variants, each variant is exported as a separate article. With Export parent products enabled, the parent product is exported as one more article (see Parent Products)
-
Products with SKUs (no variants) are exported directly
-
XML files are generated with a timestamp:
-
Files are uploaded to:
Product Assortment Filtering
When the Voyado connector has market restrictions configured, the product data export will automatically filter products based on their market assignments. This ensures that only products relevant to the connector's configured markets are included in the export.
The filtering uses the following connector settings:
| Setting | Description |
|---|---|
EnabledForMarkets | Only include products assigned to these markets |
DisabledForMarkets | Exclude products assigned to these markets |
EnabledForMarketGroups | Only include products assigned to these market groups |
DisabledForMarketGroups | Exclude products assigned to these market groups |
Products without any market assignment (MarketIds or MarketGroupIds not set) are always included in the export, regardless of market restrictions.
If none of the above settings are configured on the connector, no market filtering is applied and all products are exported.
Required Fields
Products are skipped if any of the following fields are missing:
skuIdProductIdname(variant name)mainCategoryId(and its corresponding category)
Excluding Products from Receipts and Bonus Calculations
Certain products can be excluded from appearing in receipts or from contributing to bonus point calculations in Voyado. This is achieved by adding specific custom properties to those products and ensuring these properties are enriched onto order lines, or by listing SKUs in the connector settings.
1. Exclude from Receipts
To exclude products from receipts entirely:
- Custom Property:
ExcludeFromVoyadoReceipts = true
When present on an order line, Omnium will omit that line from the exported receipt.
2. Exclude from Bonus Point Calculation
To exclude products from bonus point rewards:
- Custom Property:
ExcludeFromVoyadoBonusPoints = true
When present, Voyado will ignore the order line when calculating bonus points.
3. Exclude by SKU List
To exclude a fixed set of SKUs from receipts without changing the products or the order lines:
- Connector setting:
VoyadoExcludedSkuIds - Value: a comma-separated list of SKUs, for example
BAG01, PACKAGING, DEPOSIT
Any order line whose SKU is in the list is omitted from the exported receipt. Matching is case-insensitive. This works for SKUs that do not exist as products in Omnium, since it only looks at the SKU on the order line.
An excluded line's amount is subtracted from the receipt total and the payment amount, so the receipt stays balanced.
Receipts With No Items
Voyado rejects a receipt with no items. Omnium handles the two ways this can happen differently:
- All order lines are excluded by the methods above. The receipt is not sent, the order gets an event, and no error is set. This always applies.
- No order line is delivered, for example a POS order with quantity 0. By default the receipt is sent and Voyado rejects it with an error on the order. To skip it instead, enable
SkipReceiptsWithoutDeliveredLineson the Export order workflow step for theVoyadoExporterconnector. The order then gets an event and no error. Enable this only on workflows where such orders are expected, since an order that lost its delivered quantities by mistake is also skipped silently.
Configuration Steps
To implement either exclusion:
- Set the appropriate custom property (
ExcludeFromVoyadoReceiptsorExcludeFromVoyadoBonusPoints) on the relevant products. - Ensure these properties are enriched onto order lines during the order process.
Refer to the Order Line Enrichment Configuration section below.
Order Line Enrichment Configuration
To ensure custom product properties are copied to order lines:
- Navigate to:
Configuration → Orders → Order line - Under "Enrich order line from products", add the necessary custom properties (
ExcludeFromVoyadoReceiptsand/orExcludeFromVoyadoBonusPoints)
All properties listed here will be copied from products to the corresponding order line items automatically.
Multiple Voyado Instances
Omnium supports integration with multiple Voyado instances, with one Voyado connector per instance. Each connector must always be scoped to its markets. The connector prefix does not limit what a connector syncs. Whether you also need one depends on how customers are modeled:
- Separate customer per market (recommended): scoping is enough. Leave the connector prefix empty.
- One customer linked to several Voyado instances: in addition to scoping, set a connector prefix on each connector. The prefix keeps the
externalIds, consents and preferences from each instance apart on the same customer. A storefront or other integration must then use the prefixedexternalIdformat and read and write consents and preferences with the prefixedtype.
⚠️ Important: The prefix should be configured during setup and must not be changed once the integration is live.
Connector Scoping
For multi-instance setups, each Voyado connector should be scoped using one of the following configurations in Omnium:
EnabledForMarkets/DisabledForMarketsEnabledForMarketGroups/DisabledForMarketGroups
This ensures that each connector operates only within its intended scope and does not interfere with others.
External ID Format
When a prefix is defined, externalId's in Omnium will be generated in the following format:
<ConnectorPrefix>_VoyadoContactId
This structure ensures that each externalId is unique and clearly associated with the correct Voyado instance.
Consents and preferences synced from Voyado use the same prefix on the consent type, for example <ConnectorPrefix>_acceptsTracking and <ConnectorPrefix>_AcceptsEmail. See Consent and Preference Mapping.
Stores
By default, Omnium will use the StoreId from an order as the StoreExternalId on a receipt when sending it to Voyado.
However, in cases with multiple Voyado integrations or when the store structure differs between Omnium and Voyado, there might not be a 1-to-1 match between store IDs. To support flexible mapping, you can set an external store ID from Voyado as an externalId on the store entity in Omnium. This ensures that receipts are linked to the correct store in Voyado.
The providerName of the externalId in Omnium should by default be VoyadoExternalStoreId. The id should match the ExternalId of the corresponding store in Voyado.
Example:
As it is possible to have multiple connectors in Omnium it is also important to remember to include a potential connector-prefix in the provider name to ensure the externalId is related to the correct Voyado instance.
Market-Specific Store Mapping
Sometimes, a single store in Omnium might serve multiple markets. In such cases, it can be useful to have separate stores in Voyado for each market, even if they map to the same store in Omnium.
To handle this, you can add the MarketId as a postfix to the providerName, separated by an underscore (_). This allows Omnium to determine the correct Voyado store based on the order’s market context.
Example with multiple store references separated by market context:
In summary the provider name should have the following format for in multi instance scenario, where there are multiple stores in Voyado per store in Omnium:
<ConnectorPrefix>_VoyadoExternalStoreId_<MarketId>
Full example with connector prefix "BikeShop" and market specific stores in Voyado for single store in Omnium:
Webhooks
Omnium receives real-time events from Voyado over webhooks and reacts instantly, without polling. All events arrive on one endpoint, every request is verified with a signing secret, and the payload can additionally be encrypted.
| Event | Status | Purpose |
|---|---|---|
| Bonus points | Available | Keep the bonus point balance in sync |
| Vouchers | Available | Import reward vouchers and redeem them at capture |
| Promotions | Coming | Import personal offers assigned to a contact |
The SFTP voucher import is legacy; use the webhook for new setups. Promotion assignments are imported over SFTP until the promotion webhook ships.
Initial configuration
One Voyado endpoint carries every event. Set it up once per Voyado connector, then add the events you need.
- Ask Voyado to activate the events. Voyado activates webhooks per account and per event. Contact Voyado Solution & Delivery if you are new to webhooks, or Voyado Support to add further events to an existing setup. Events are not delivered until Voyado enables them server-side, even after you have subscribed to the event.
- Add the endpoint in Voyado's webhooks dashboard: choose Add Endpoint, set the Endpoint URL to
https://{your-omnium-api-domain}/api/VoyadoWebhook, subscribe to the events you use, and save it. Then open the endpoint, go to Advanced, and add a header with keyomniumtenantidand value set to your Omnium tenant id. - Copy the signing secret shown on the endpoint in Voyado into the Voyado connector in Omnium, Connection tab, Webhooks panel, field Webhook signing secret. See Signing secret.
- Enable the events on the connector's Loyalty tab. Each event's setting is named in its section below.
Omnium resolves the connector by matching the payload tenant to the connector host subdomain (for example omnium from https://omnium.voyado.com). If an account's URL differs from the tenant Voyado sends, set a VoyadoTenantName property on the connector to that value.
An event the connector has not enabled is acknowledged and ignored, so nothing is imported until its setting is on.
Signing secret
Every webhook request is verified before its payload is read. Voyado signs each request with the endpoint's signing secret, and Omnium recomputes the signature with the secret stored on the connector and compares the two. A request that cannot be verified, because the connector has no secret or the signature does not match, is rejected with 401 Unauthorized and not processed.
If you change the secret in Voyado, paste the new one into the connector.
The secret is per endpoint. If you run several Voyado connectors on one tenant, each has its own endpoint in Voyado and its own secret.
Payload encryption
Voyado can encrypt the event payload for a tenant. This is optional and is enabled on the Voyado side, for the whole tenant rather than per endpoint. When it is on, every event arrives with isEncrypted set to true and an encrypted payload, and Omnium decrypts it with the key from the connector before handling the event as usual.
To enable it:
- Ask Voyado to enable payload encryption for the tenant. Voyado provides the encryption key.
- Paste the key into the Voyado connector, Connection tab, Webhooks panel, field Webhook encryption key.
Bonus points
Event point.balance.updated · Setting Loyalty → Sync bonus points (webhook)
Sent whenever the balance changes. The balance is a full snapshot that replaces the stored value and shows on the customer card.
Vouchers
Event reward.voucher.created · Setting Loyalty → Vouchers set to Webhook
Voyado converts accumulated bonus points into reward vouchers (bonus checks). Omnium imports each one and can redeem it back in Voyado. The payload carries the Voyado voucher id, which the SFTP export lacks; without it a voucher cannot be redeemed through Voyado's API.
How it works
- Voyado creates reward vouchers in two daily batches (05:00 and 22:00), sending one event per voucher it creates for a customer.
- Omnium imports the voucher and links it to the customer, creating the customer from the Voyado contact if needed.
- Apply the voucher to a cart (UI Payments → Voucher, or
api/cart/{cartId}/ApplyVoucher/{voucherId}); it becomes an authorized payment with status Applied. - On capture, Omnium marks it Redeemed and redeems it in Voyado (reward-voucher API v3). Non-blocking: capture succeeds even if Voyado is down.
- On credit or cancel, Omnium frees the voucher and reactivates it in Voyado.
Redemption is Omnium-only. A webhook voucher can only be redeemed through Omnium (including Omnium POS), not from an external POS.
Vouchers also require the Voucher payment type (Vue-template voucher-payment) and the daily VoucherExpirationScheduledTask to enforce expiry.
Promotions (coming)
Not yet available in the connector settings. The webhook event promotion.multiChannel.assigned will replace the SFTP assignment import for personal offers. Everything else in the Promotions setup (promotion in Omnium, workflow steps, redemption) stays the same.
Promotions (Personal Offers)
Voyado assigns personal offers to contacts. Omnium redeems the coupon in Voyado when the order goes through. The two are linked by a shared code.
Important A Voyado coupon only works in Omnium if a matching promotion exists in Omnium. The discount logic (percentage, amount, etc.) is configured in Omnium, not in Voyado. Each coupon is single-use and can only be redeemed once.
Setup
-
Create the promotion in Omnium with
IsPersonalCouponPromotion = trueand aDiscountCode. -
Create the promotion in Voyado Engage of type Multichannel, with a redemption channel
type: ECOM,valueType: EXTERNALOFFERand the OmniumDiscountCodeas value. -
Enable the assignment import on the Voyado connector (see below).
-
Add two workflow steps with connector
VoyadoExporterandStopOnError = true:CheckPersonalDiscountCouponsandTryRedeemPersonalDiscountCoupons. Place them on order status New.Note: The steps can also run just before payment capture. Either placement prevents two completed orders from using the same coupon, but only New redeems it at order placement, so the customer cannot place a second order with the coupon while the first is still open.
How it works
- Voyado assigns the promotion to a contact. The import stores the coupon on the customer in Omnium, creating the customer from the Voyado contact if needed (matched on
CustomerUniqueIdentifier). - The coupon code is applied to the cart (
CartAddCouponCodeToCartor the cart UI). Omnium only accepts it if the customer holds that coupon. - When the order is placed, the workflow checks the coupon against Voyado and redeems it (
/api/v2/promotions/codes/{promotionId}/redeem).
Assignment import
Over SFTP (current)
Set Promotions to SFTP on the connector's Loyalty tab and fill in the FTP Connection (Host, Username, Password) on the Connection tab. The setting also adds the scheduled task Voyado - Coupon Synchronization (VoyadoPromotionSyncScheduledTask, every 5 minutes) to the tenant, and removes it again when set to Off, so the task does not need to be set up separately.
The task reads /couponExport/ on Voyado's SFTP server and handles Assigned, Redeemed (in another channel, e.g. POS) and Deleted coupons. Failed files are moved to /couponExport/failed/. Coupons are therefore not available in Omnium immediately after assignment.
Over webhook (coming)
Not yet available. See Webhooks: Promotions. It replaces only this import; the rest of the setup is unchanged.
Troubleshooting
| Error | Description |
|---|---|
PromotionNotFound | The promotion ID doesn't exist in Voyado |
PromotionAlreadyRedeemed | The coupon has already been used |
PromotionNotAssociatedWithContact | The coupon isn't assigned to this customer |
PromotionNotValidForRedemptionChannel | The coupon isn't valid for the ECOM channel |
Coupons not showing up: check /couponExport/failed/, the SFTP connection and that Promotions is set to SFTP.
Vouchers over SFTP (Legacy)
Legacy. New setups should use the Voucher webhook. The SFTP voucher export does not include the Voyado voucher id, so vouchers imported this way cannot be redeemed or reactivated through Voyado's API; Omnium only marks them redeemed when the receipt is exported to Voyado.
Voyado can be used to accumulate bonus points from purchases and convert these point to bonus checks. The Omnium-Voyado integration supports import and redemption of bonus checks generated and assigned in Voyado when placing orders in Omnium. In Omnium the corresponding concept is called Vouchers.
How it works
- Voyado generates vouchers from accumulated bonus points.
- Omnium has a scheduled task that retrieves both new and redeemed vouchers from Voyado.
- New Vouchers from the import are created in Voyado and assigned to the private customer connected to the voyado contact that was assigned the voucher.
- If this customer does not already exist in Omnium, Omnium will try to create it by fetching data from Voyado.
- Vouchers redeemed in Voyado will be redeemed in Omnium as well, in case a voucher is redeemed through another channel.
- The vouchers should now be available to inspect from either the private customer cart in Omnium or retrieved using the Omnium voucher-api.
- In order to use a voucher in Omnium, apply it to a cart. This can be done through the UI under payments -> voucher or through the api-endpoint
api/cart/{cartId}/ApplyVoucher/{voucherId} - This will add the voucher as an authorized payment on the order as well as updating the voucher status to Applied (thus preventing multiple uses of the same voucher in Omnium).
- When completing an order, the capture payment workflow step will set the voucher payment to “captured” and update the voucher status to “Redeemed”
- The voucher in Voyado will be marked redeemed once the receipt is exported to Voyado. This happens on the workflow step “Export Order” that is usually executed on the last order status.
Setup
- Set Vouchers to SFTP on the connector's Loyalty tab.
- Set up the FTP Connection on the Connection tab.
- Set the DefaultCurrency-setting under Voyado order settings. This will determine the currency on imported vouchers and should be the same as the group currency in Voyado.
- In Voyado the Voucher export file must be configured to contain contactId, this is required to connect the voucher to the correct customer in Omnium.
- Add the paymenttype “Voucher” in Omnium settings. The only thing that needs to be set in the payment type settings is Vue-template = “voucher-payment”
- Setup scheduled task VoucherExpirationScheduledTask in order to enforce the expiration dates on vouchers. It is sufficient for this task to run once a day. Only vouchers with status “Available” will be affected by this task. This means that all vouchers that are applied before the expiration date can still be captured after the expiration date.
The webhook-based Voucher integration supersedes this SFTP export and provides the voucher id that Omnium needs to redeem and reactivate vouchers through Voyado's API.
Bonus Points Sync
Bonus point balance updates are received over a webhook. See Webhooks: Bonus points for the setup, event, and endpoint.
Voyado Order API - V2
The Omnium-Voyado integration enables sending transactional emails via Voyado, using the Voyado Order API v2.
Setup
-
Activate the Exporter Enable the
VoyadoOrderExporterfrom the Voyado settings UI in Omnium. -
Configure the Workflow In Omnium, add the
ExportOrderaction to any workflow step where you want to trigger a Voyado action.- Set the Connector to
VoyadoOrderExporter.
- Set the Connector to
How It Works
-
Setting up Omnium
For each order status in Omnium where a transactional email in should be triggered in VOyado, add a workflow step called
ExportOrderusing the connector VoyadoOrderExporter.Note: Do not confuse VoyadoOrderExporter with VoyadoExporter, which handles receipt exports.
The
ExportOrderstep will:- Map the Omnium Order to Voyado's
OrderModel. - Send the order data to Voyado's
/api/v2/ordersendpoint.
- Map the Omnium Order to Voyado's
-
Configuring Email Triggers in Voyado
In Voyado, configure transactional emails to trigger upon receiving an order with one of the relevant statuses from Omnium.
Voyado Order API – V3
Omnium now supports Voyado Order API V3, a more flexible and powerful version than its predecessor. This integration enables triggering various order-related actions in Voyado directly from Omnium.
Setup
-
Activate the Exporter Enable the
VoyadoOrderV3Exporterfrom the Voyado settings UI in Omnium. -
Configure the Workflow In Omnium, add the
ExportOrderaction to any workflow step where you want to trigger a Voyado action.-
Set the Connector to
VoyadoOrderV3Exporter. -
OPTIONAL: In the Properties tab of the workflow step configuration modal:
-
Add a property with key:
VoyadoOrderAction -
Set the value to:
"ACTION_NAME"(ReplaceACTION_NAMEwith the specific action to trigger in Voyado.) -
To add data to the order action: Add properties with keyGroup
VoyadoActionExtraDataand key equaling the propertyName in Omnium. The property name can point to string values on order/shipment/return root or custom properties on the order, shipment, or return. -
To add line-item level data to the order action: Prefix the property key with
LineItem.(e.g.,LineItem.Color). This will resolve the property for each line item in the shipment (or order form if no shipment) and include it in the action payload under anitemLevelarray.
-
-
Example of how the export workflow step JSON should look:
How It Works
The Omnium–Voyado integration operates by executing hooks in the Omnium order workflow that initiate an export to Voyado and trigger a specific action.
Here's a step-by-step outline:
-
Triggering the Export When a configured workflow step executes the
ExportOrderaction, Omnium initiates an export to Voyado containing the specified order action as an embedded order action. -
Polling for Completion Omnium receives a job reference from Voyado and continuously polls the API to monitor the status of the order import job.
-
Error Handling If an error occurs (e.g., a failed import or API error), it is logged in Omnium and associated with the affected order. These errors are visible from both the Order Detail Page and the Order List.
Note: Due to the asyncronous nature of this part of the integration Omnium will perform steps 2-3 asynchronously in the backgroud. The order workflow will continue to execute in the meantime, and there is no guarantee that action in Voyado is completed nor successful at time the next workflow step in Omnium is executed.
Return Order Exports
The VoyadoOrderV3Exporter also supports exporting return orders to Voyado. This allows triggering Voyado actions when a return is processed in Omnium (e.g., sending a return confirmation email).
Setup
- In Omnium, add the
ExportReturnaction to the relevant return workflow step. - Set the Connector to
VoyadoOrderV3Exporter. - OPTIONAL: Configure a
VoyadoOrderActionproperty andVoyadoActionExtraDataproperties on the workflow step, just like for order exports.
How It Works
The return export follows the same pattern as order exports:
- Omnium maps the return order form to the Voyado Order V3 format, including the return status.
- If a
VoyadoOrderActionis configured on the workflow step, it is included as an embedded order action on the request. - Omnium sends the return data to Voyado. If the return has been exported previously (tracked via
externalId), Omnium will update the existing order in Voyado. Otherwise, a new order is created. - Omnium polls the job status asynchronously to verify completion, the same as for order exports.
Notes
- The return exporter resolves the Voyado contact using the same customer lookup logic as the order exporter (private customer first, then business customer).
- If the
VoyadoOrderV3Exporterconnector is configured as a related connector, the main connector settings are used for customer lookup. - The return
externalIdkey uses the connector prefix (if configured) to support multi-instance setups.
Anonymous Contact Creation (Guest Orders)
When exporting orders via VoyadoOrderV3Exporter, if no matching customer exists in Omnium, the exporter can optionally create an anonymous Voyado contact of type Contact using the order's email, name, and phone — without creating any customer record in Omnium.
This is useful for guest checkouts where transactional emails in Voyado should still be triggered even though the customer is not registered in Omnium.
Setup
- Ensure the
VoyadoOrderV3Exporteris active and hasRelatedConnectorpointing to the main VoyadoExporter connector. - On the main VoyadoExporter connector settings, enable Create anonymous contact on missing customer.
Behavior
- If no Omnium customer is found for the order and the setting is enabled, Omnium creates a Voyado Contact using:
- Email (required — if the order has no email, the export is skipped with a warning)
- Name (split into first and last name)
- Mobile phone (if present)
- If a contact with the same email already exists in Voyado, the existing contact is used instead.
- The order export then proceeds normally using the resolved Voyado contact ID.
- No Omnium customer record is created.
Order Action Extra Data
Order/Shipment/Return Level Properties
When configuring VoyadoActionExtraData properties on a workflow step, the property key refers to a property name on the entity being exported. The resolution order depends on the export type:
- Order exports: Shipment properties are checked first, then order properties.
- Return exports: Return order form properties are checked first, then order properties.
For each property, the system first checks custom properties on the entity, and then falls back to built-in properties on the entity root (e.g., Status, Id).
Line-Item Level Properties
To include per-line-item data in the order action, prefix the property key with LineItem. in the VoyadoActionExtraData configuration.
For example, configuring LineItem.Color will:
- Iterate over all line items in the shipment (or order form if no shipment is present).
- For each line item, resolve the
Colorproperty (first from custom properties, then from built-in fields). - Include the result in an
itemLevelarray in the action data payload.
Each entry in the itemLevel array contains the line item's id and the resolved property values.
Example resulting action payload:
Multiple LineItem.* properties can be configured. If multiple properties are specified for the same line item, they are merged into a single entry per line item.